Last modified: Mar 18, 2023 By Alexander Williams
Creating an Image Cartoonizer with Flask - Complete with Source Code
The Image Cartoonizer app is an application that can convert any image into a cartoon. In this tutorial, we will learn how to build an Image Cartoonizer using Flask, cv2, scipy, and numpy. Additionally, we will be using Vue.js and Axios for the front end.
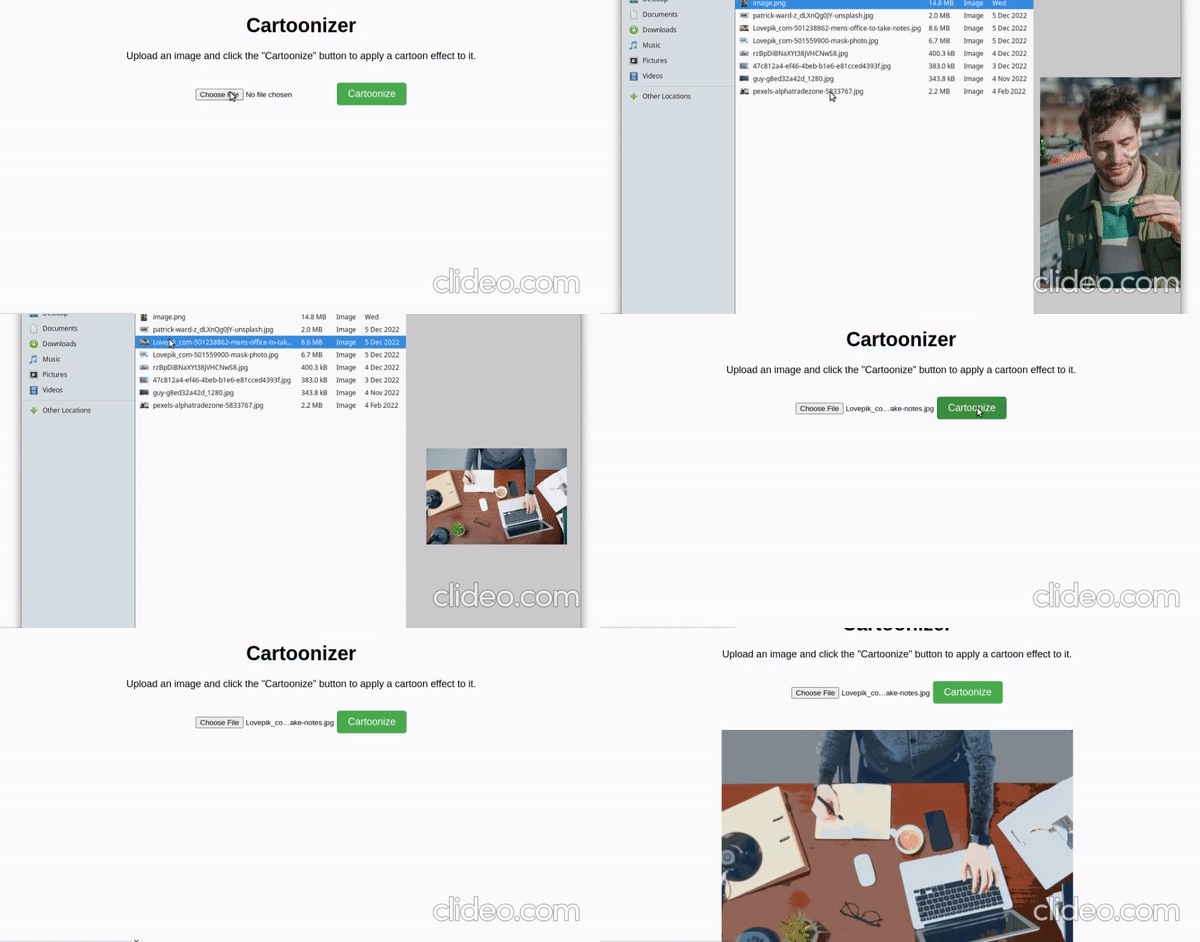
Before we get started, let's take a look at the demo of the application we will be building:

Setup Flask project
If you already have a Flask project set up, you can proceed to the next step. However, if you are starting from scratch, here is a step-by-step guide on how to create a Flask project and install the requirements:
1. Create a new virtual environment:
python3 -m venv env2. Activate the virtual environment:
source env/bin/activateActivate for windows:
env\Scripts\activate4. Install Flask using pip:
pip install Flask5. Install cv2 using pip:
pip install opencv-python
6. Install scapy using pip:
pip install scipy7. install numpy using pip:
pip install numpyCreate the project directory:
mkdir ImageToCartoonCreate a directory app inside the ImageToCartoon folder:
mkdir appInside the app directory, we need to create the following:
Directory for the templates:
mkdir templatesDirectory for the static files:
mkdir staticPython file for the code:
touch core.pyDone.
Flask Image Cartoonizer
Now let's write the code that converts the image to Cartoon.
def update_c(C, hist):
    # Loop until the bin centers converge
    while True:
        # Initialize an empty dictionary to store pixel indices for each bin
        groups = defaultdict(list)

        # Assign each pixel to the nearest bin center
        for i in range(len(hist)):
            if hist[i] == 0:
                continue
            d = np.abs(C - i)
            index = np.argmin(d)
            groups[index].append(i)

        # Create a new set of bin centers based on the average pixel intensity in each bin
        new_C = np.array(C)
        for i, indice in groups.items():
            if np.sum(hist[indice]) == 0:
                continue
            new_C[i] = int(np.sum(indice * hist[indice]) / np.sum(hist[indice]))

        # If the bin centers haven't changed, exit the loop
        if np.sum(new_C - C) == 0:
            break
        C = new_C

    # Return the final set of bin centers and the pixel indices for each bin
    return C, groups


def K_histogram(hist):

    # Set the significance level and minimum number of pixels per bin
    alpha = 0.001
    N = 80

    # Initialize the bin centers to the middle gray value
    C = np.array([128])

    while True:
        # Assign each pixel to the nearest bin center
        C, groups = update_c(C, hist)

        # Create a new set of bin centers
        new_C = set()
        for i, indice in groups.items():
            # Skip bins with fewer than N pixels
            if len(indice) < N:
                new_C.add(C[i])
                continue

            # Test for normality of the pixel intensities in the bin
            z, pval = stats.normaltest(hist[indice])

            # If the pixel intensities are not normal, split the bin into two
            if pval < alpha:
                left = 0 if i == 0 else C[i-1]
                right = len(hist)-1 if i == len(C)-1 else C[i+1]
                delta = right - left

                # If the range of the bin is large enough, split it
                if delta >= 3:
                    c1 = (C[i] + left) / 2
                    c2 = (C[i] + right) / 2
                    new_C.add(c1)
                    new_C.add(c2)
                else:
                    new_C.add(C[i])
            else:
                new_C.add(C[i])

        # If the set of bin centers hasn't changed, exit the loop
        if len(new_C) == len(C):
            break
        else:
            C = np.array(sorted(new_C))

    return C


def cartoonize_image(img):
    # Define a kernel for erosion
    kernel = np.ones((2, 2), np.uint8)

    # Apply bilateral filter to each channel to smooth the image
    output = np.array(img)
    x, y, c = output.shape
    for i in range(c):
        output[:, :, i] = cv2.bilateralFilter(output[:, :, i], 5, 150, 150)

    # Apply Canny edge detection to detect edges
    edge = cv2.Canny(output, 100, 200)

    # Convert the image to HSV color space for histogram equalization
    output = cv2.cvtColor(output, cv2.COLOR_RGB2HSV)

    # Compute histograms for each channel
    hists = []
    hist, _ = np.histogram(output[:, :, 0], bins=np.arange(180 + 1))
    hists.append(hist)
    hist, _ = np.histogram(output[:, :, 1], bins=np.arange(256 + 1))
    hists.append(hist)
    hist, _ = np.histogram(output[:, :, 2], bins=np.arange(256 + 1))
    hists.append(hist)

    # Apply K-means clustering to each histogram to get color centroids
    C = []
    for h in hists:
        C.append(K_histogram(h))

    # Replace each pixel with its nearest color centroid
    output = output.reshape((-1, c))
    for i in range(c):
        channel = output[:, i]
        index = np.argmin(np.abs(channel[:, np.newaxis] - C[i]), axis=1)
        output[:, i] = C[i][index]
    output = output.reshape((x, y, c))

    # Convert the image back to RGB color space
    output = cv2.cvtColor(output, cv2.COLOR_HSV2RGB)

    # Find contours of the edges and draw them on the image
    contours, _ = cv2.findContours(edge, cv2.RETR_EXTERNAL, cv2.CHAIN_APPROX_NONE)
    cv2.drawContours(output, contours, -1, 0, thickness=1)

    # Apply erosion to smooth out the image
    for i in range(3):
        output[:, :, i] = cv2.erode(output[:, :, i], kernel, iterations=1)

    return output
Here, we've 3 functions:
update_c: Updates the bin centers by assigning each pixel to the nearest bin center and then creating a new set of bin centers based on the average pixel intensity in each bin.
K_histogram: Performs a K-histogram algorithm on a histogram of pixel intensities. The K-histogram algorithm helps to create bins that are more normally
cartoonize_image: Takes an input image img and applies a series of image processing steps to create the cartoon image.
Next, let's integrate this function into our Flask app. In the core.py file, we will write the routes for the home page and the cartoonize function:
from flask import Flask, render_template, request, redirect, url_for, jsonify
import os
import cv2
from scipy import stats
import numpy as np
from collections import defaultdict
import base64

app = Flask(__name__)

@app.route('/')
def home():
    return render_template('index.html')


@app.route('/cartoonize', methods=['POST'])
def cartoonize():
    # Check if an image was uploaded
    if 'image' not in request.files:
        return redirect(url_for('home'))

    # Read the image from the request and save it
    image = request.files['image'].read()
    with open('image.png', 'wb') as f:
        f.write(image)


    # Cartoonize the image
    cartoon = cartoonize_image(cv2.imread("image.png"))

    # Save the cartoonized image
    cv2.imwrite('cartoon.png', cartoon)

    # Return the cartoonized image as a response
    with open("cartoon.png", 'rb') as f:
        response = f.read()

    os.remove('image.png')
    os.remove('cartoon.png')

    #result_b64 = base64.b64encode(response).decode('ascii')
    file_data = base64.b64encode(response).decode('utf-8')

    return jsonify({'data': file_data})


if __name__ == '__main__':
    app.run(debug=True)
The cartoonize route receives a POST request to cartoonize an uploaded image. The request redirects to the home page if it does not contain an image.
Then, the cartoonize_image() function process the image, and it returns a cartoonized version of the image.
After that, the cartoonized image is opened, encoded as base64, and returned the image as a JSON response.
Finally, the uploaded image and the cartoonized image are deleted from the server using os.remove().
Now, we will create the index.html file inside the templates directory. In index.html, we will write the upload image form and send the image to the Flask function using Vue.js and Axios.
Index.html:
<!DOCTYPE html>
<html>
<head>
    <meta charset="utf-8">
    <title>Cartoonizer</title>
    <script src="https://cdn.jsdelivr.net/npm/vue/dist/vue.js"></script>
    <script src="https://cdn.jsdelivr.net/npm/axios/dist/axios.min.js"></script>
    <link rel="stylesheet" href="{{ url_for('static', filename='css/style.css') }}">
</head>
<body>
  <!-- The Vue app -->
    <div id="app">
        <h1>Cartoonizer</h1>
        <p>
            Upload an image and click the "Cartoonize" button to apply a cartoon effect to it.
        </p>
        <input type="file" v-on:change="onFileSelected">
         <!-- When the "Cartoonize" button is clicked, the "cartoonizeImage" method is called -->
        <button v-on:click="cartoonizeImage">Cartoonize</button>
        <br><br>
         <!-- If a cartoonized image has been generated by the server, display it using an img element -->
        <div v-if="cartoonizedImage">
            <img :src="cartoonizedImage" style="max-width: 80%; max-height: 80%; ">
        </div>
    </div>
    <script>
       new Vue({
    el: '#app',

    data: {
        imageFile: null,        // The selected image file
        cartoonizedImage: null  // The cartoonized image generated by the server
    },

    methods: {
        // Handler for when the user selects an image file
        onFileSelected(event) {
            this.imageFile = event.target.files[0];
        },

        // Handler for when the user clicks the "Cartoonize" button
        cartoonizeImage() {
            if (!this.imageFile) {
                return;
            }


            const formData = new FormData();
            formData.append('image', this.imageFile);

            // Send a POST request to the flask server with the selected image file as the payload
            axios.post('/cartoonize', formData, {
                headers: {
                    'Content-Type': 'multipart/form-data' // Set the Content-Type header to multipart/form-data
                }
            }).then(response => {
                // Set the cartoonized image to the data property, with the base64 encoding
                this.cartoonizedImage = 'data:image/jpeg;base64,' + response.data.data;
            }).catch(error => {
                console.log(error); // Log any errors to the console
            });
        }
    }
});
    </script>
</body>
</html>
If we go to "http://localhost:5000" in the browser, we will see the form displayed.

Now, it's time to test our app.
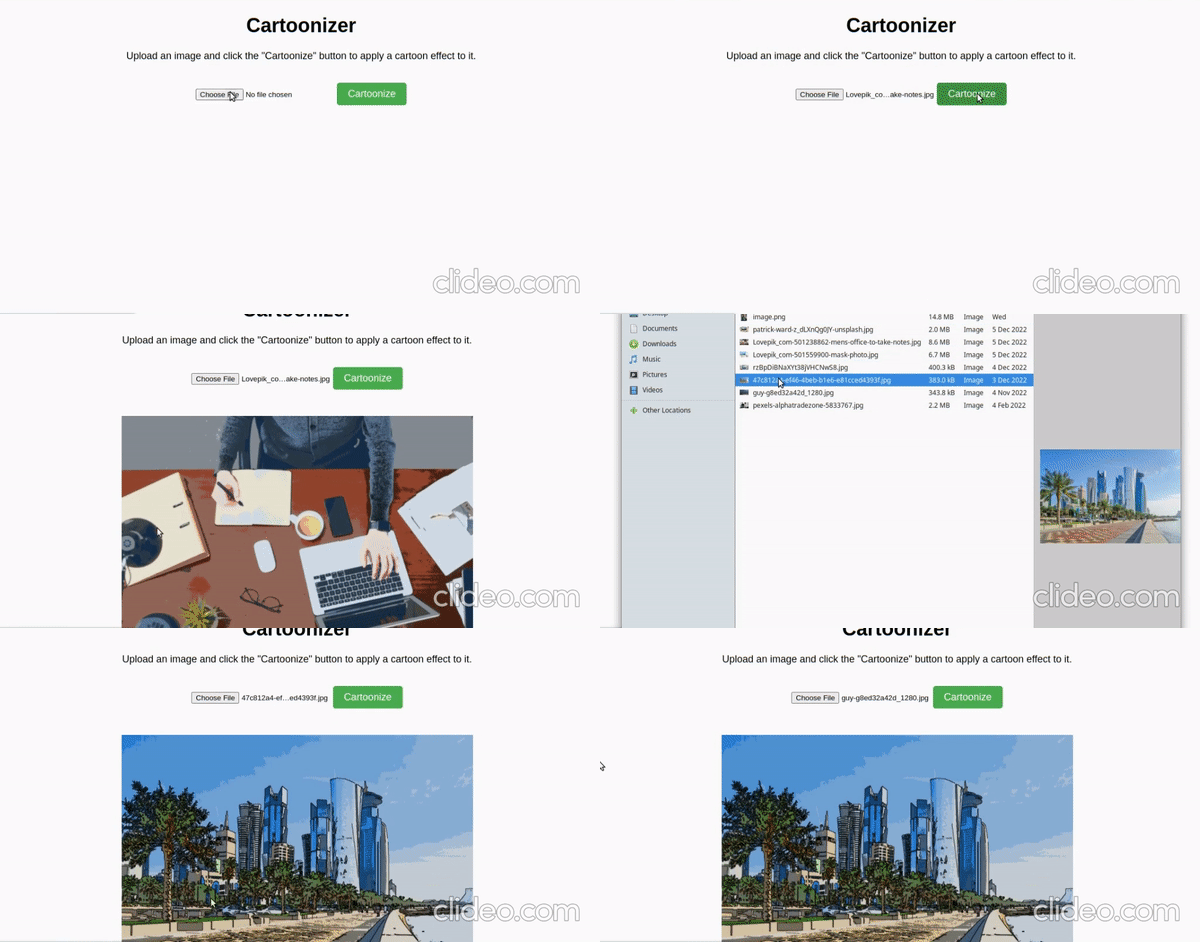
Image Cartoonizer Demo
In the following demo, we have cartoonized multiple images.

As you can see, all the images have been converted to cartoons.
Project On GitHub
The Image Cartoonizer app that we have built is available on GitHub. The requirements.txt file is also included in the project.
Conclusion
In conclusion, we have successfully built an Image Cartoonizer application using Flask, cv2, scipy, and numpy, along with Vue.js and Axios for the front end. This project can be extended and customized to suit different needs, such as adding image filters or creating a web service for cartooning images.
Happy Coding!